Tuesday, January 6, 2015

{Pintried and Pintrue} Pinflop - - Olive Oil Candle


Welcome 2015! We took a short break and are really excited to be offering you another blog post. 
Although this pinflop isn't as severe as our Listerine Foot Soak, what is advertised in the above picture isn't what it seems. 

Here are our materials for this pin:

Looks fairly simple and unassuming... wrong!
Here is the final and most difficult material with this pin:
PAPERCLIPS, how deceiving the original photo is!

As you can tell by the above photo, it took us several attempts to manipulate the paperclip appropriately to secure and stabilize the wick. We took some liberty with placement of the paperclip because it isn't as eye appealing as one would like. 
Check out these photos:
Not very sightly!

Ok, we are trying to be positive... don't attempt this in house with small children!

And, proof! Wick burnt out as soon as it met the paperclip.

Finally, we figured out the most effective and eye appealing paperclip placement. 


See, we were able to make this pin work but would we do not suggest making this as gifts or as temporary fixtures in our home, NO! 
Oh and just so you are aware it does stay lit for over an hour. 

In all fairness, you can make it, you can light it and it will stay lit... but its not pretty and its not practical so it's up to you to determine whether to attempt this pin or to move along to the next pin!


Sunday, August 3, 2014

Pintried and Pintrue: PINTRUE - Microwave Clean


          Original Pin Posting: Microwave Clean

I don't know what the weather was like for you this weekend but here on the Outer Banks it's been a rain filled weekend. Leaving us locals to face our biggest fears... cleaning our own homes instead of enjoying the wonderful the beach and water that surrounds us!
Typically I'm not a big microwave person and this is due mainly to how my fiancé leaves our microwave after he uses it.
Exhibit A:
 Exhibit B:


You might be shaking your head at me thinking, Marie you really need to get this behavior fixed before you get married. However, I choose to let this small battle slide in order to win the war!
My hope is educating him on cleaning the microwave after using this pin.

Of course I turned to Pinterest to find me a quick helpful trick in cleaning my um, eclectic microwave. I'm happy to report that this pin was all that it promised!
I did alter the above recipe just to make it a little easier on myself to shorten my cleaning time.

1 cup of water (I don't think it matters if its warm or not because you'll be heating it in the microwave)
1 cup of white distilled vinegar
1 bowl
Microwave for 10 minutes
2 Dish cloths (let the dish cloth soak in the leftover water and vinegar soak in the microwave for 20 minutes to cool)
1 cup of cold water to the mixture to help in the cooling process so you can touch the cloth without burning your hands
Use the remaining dish cloth dry to wipe up the remaining liquid and left over "food" that was not removed by the water and vinegar solution.

Voila:


This took me under five minutes to wipe down, which is quite shocking when reviewing the evidence above. I'm glad I saved the solution to wring my dish cloth out to get a clean wipe each time I went to clean. No scrubbing involved and the dry dish cloth was most helpful in the corners which were a little more stubborn than I would have liked but all in all this was a PINTRUE.
Happy cleaning and pinning!
Let Marie and Amanda know if this pin worked for you, leave a comment below.


Sunday, July 6, 2014

Pintried: Wrapped Sea Glass and Shark Tooth Necklace

Pintried: Wrapped Sea Glass and Shark Tooth Necklace


The "pinspiration" from this necklace came from a class I took a few years ago at a Nags Head Bead and Jewelry store called Cloud Nine. If you have the time and happen to be visiting the Outer Banks, I most definitely recommend taking Mrs. Ginny's two hour sea glass wrapping class. If you're not a local and don't visit the Outer Banks I suggest you consider seeking out a local bead and jewelry store. I honestly did not think that I had the creativity or skill to create anything and I was pleasantly surprised when I took the class (which was only $25 and included all the materials)!


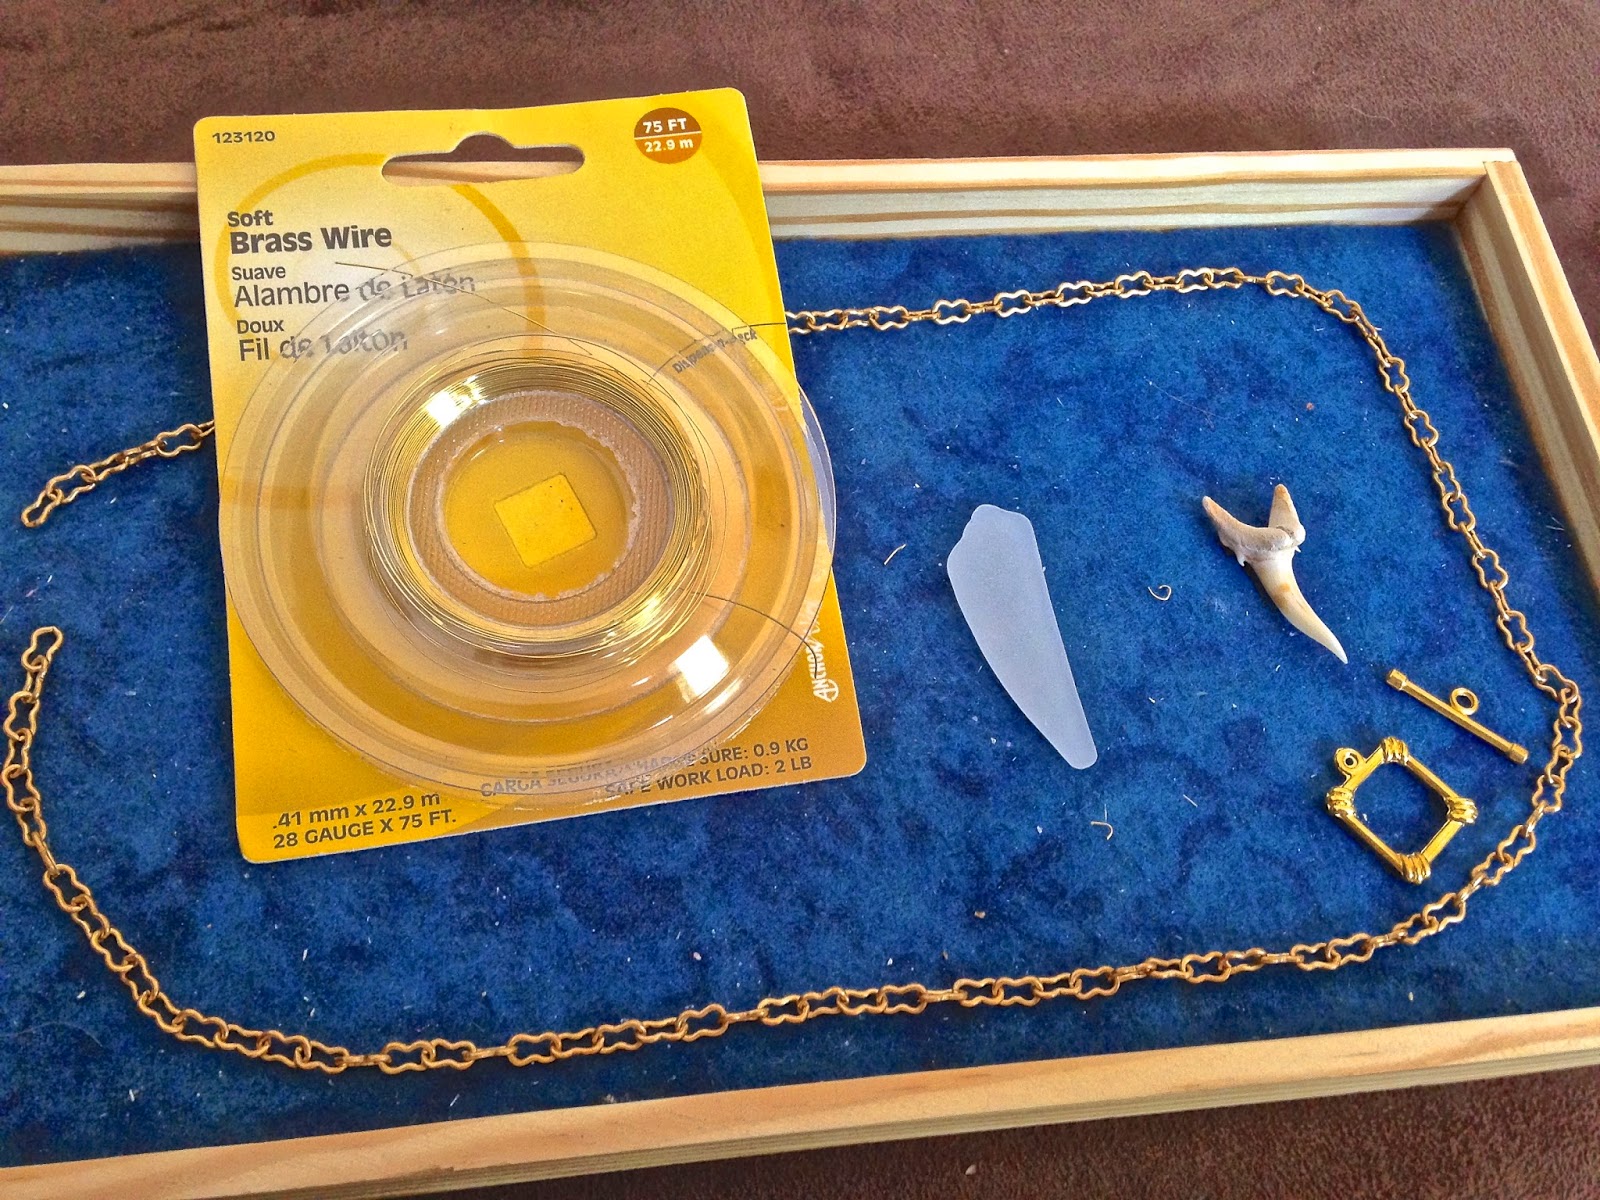
Materials

Brass wire
Brass chain
Brass clasp
1 piece of sea glass
1 shark tooth
1 set of wire jewelry pliers

I was able to purchase everything at Cloud Nine as well as Ornamentea from when my sister was living in Raleigh. I'm a frequent beachcomber so I had several pieces to pick from! My daring fiancé located the shark's tooth on one of his deep sea dives and brought it up hoping I would use it for my jewelry making. 
First Step

Cut the wire at length that you feel comfortable will wrap around the sea glass and shark tooth. Take the end of one side of the wire and make a loop then wrap the loop closed. Once you have your loop closed creativity is yours. For these particular items I wrapped them minimally to let the pieces speak for themselves. 
Second Step 

Cut one link off of the chain and layer the tooth over the glass through the created loops.

Third Step

Decide how long you would like your chain to measure and remember that you will have two "charms" hanging off the bottom part of the necklace and include that in your measurement. Then cut the last link on both ends of your chain to attach either side of your clasp. Close the link by using your pliers to ensure the clasps will stay on. 

Final Step
Attach the link that contains the sea glass and shark tooth and use your pliers to fasten the link onto your measured and desired middle section of your chain. Most importantly, enjoy and be proud to tell others that you made this when they compliment you on your new necklace. 

On a side note... people will start asking you to make them one also because they will like yours so much as well as the price!

Leave a comment below and tell us how your necklace turned out as well as the name of your local bead and jewelry store! 


Tuesday, June 17, 2014

Pintried: Spaghetti Squash and Veggie Marinara 


     Have you ever thought about adding a vegetarian night to your meat routine but have some picky eaters in your house? Then this is the recipe for you. Pintried and PinFabulicious! Even my hardest critic, my meat loving southern raised father, thought it was divine! I would say quick and easy. However, the cook time on the squash does take some time.  I think you'll find it is worth the wait.

Ingredients:

1.) One Spaghetti Squash 

(and here's the great part...whatever else is in your pantry or fridge!)

Here is what I added:

2.) 1-2 cans tomatoes drained (I like two but my husband likes one!)

3.) 1 package fresh mushrooms or 1 can

4.) 1 can black olives

5.) 1 onion sliced (Leave it out if you want to. I did for my friend who can't do onions and it was just as tasty)

6.) 1 can black beans rinsed... if you want the protein 

7.) 1 small yellow summer squash

8.) get creative...corn, garlic, peppers, zucchini (I've tried it all in a pinch and it's all good!)

9.) grand finale... parmesan cheese if you do dairy 


Directions:

Preheat oven to 350, cut spaghetti squash in half the long ways, place in greased (olive oil) casserole dish and cook for 45 minutes to one hour. You should be able to easily push a fork easily through the skin when it is done.  Once you remove the squash halves from the oven, gently take your fork and scrape out the seeds. After you remove the seeds use your fork to fluff the "noodles" out of the squash. Meanwhile sauté the onions, add other veggies and allow to simmer. Add salt, pepper and other seasoning to taste. I like Italian seasoning. Viola, you are done! Below is a picture of my most recent marinara. I would have taken a picture to post of the meal put together but we were starving and ate it all! 


PS Keep in mind, this is not pasta, its squash! Spaghetti Squash has gotten a lot of bad publicity by people claiming it doesn't really taste like spaghetti. It's not supposed to, but keep an open mind and you'll love it. (or you can always just trick your guests like I did my dad and refuse to tell him what's in it until after he tried it)


Post a comment below and let us know how it worked for you!

Tuesday, June 3, 2014

Pinflop - Listerine Foot Soak


Original Pin Posting Listerine Foot Soak


 We like easy tasks, when we saw this pin and its potential to increase beauty and fun time we were ready to try it out! But... you know how the saying goes, "If it looks too good to be true, it probably is!" so is the case for this pin.

We followed the directions of 1/4 cup of Listerine, 1/4 cup of Vinegar and 1/2 of water for 15 minutes.  Immediately we were suspicious because there wasn't enough liquid to cover our feet, reference the picture below. 

But we wanted to stay true to the original pin so we improvised with the following:
Needless to say, only the bottoms of our feet were covered by the solution. Truthfully that is the problem area that we were targeting, so no complaints at this point. 
We set our timer and prepared for a blissful 15 minutes of soaking and girl time. 
Tick, Tock, Tick, Tock.... TIMES UP!

Sadly the skin did not simply wipe away as suggested in the above pin. Our faith did not waiver!!! We simply increased the solution to cover our feet and soaked again for another 15 minutes. PINFLOP, again. So we decided to triple the recipe and soak for a total of 45 minutes. 

So, what did we and what can you take away from this PINFLOP? 
Save your time and money and go to the salon. We tried purchasing and using both Listerine and Generic Mouthwash. I didn't make a difference. Listerine is expensive. Invest your time and money in a professional pedicure. You're worth the time and money spent on a professional pedicure. If you're like us working all week long, paying attention to family and household responsibilities you have earned some me time. Unfortunately this pin is not going to give the me time it advertises. 

Other negatives about this pin:
1. The soak was not relaxing it burned our feet. 
2. It turned our feet green and blue respectively.
3. The soak's smell was not pleasant or refreshing.